Problem with dual monitor setup on Windows 10? Follow these troubleshooting steps to fix “Second Monitor Not Detected” on Windows 10.
Multitasking is so in demand that one screen is not enough to furnish our tasks. It’s high time to have dual monitor setup on Windows 10 to create a larger canvas and meet our business needs. Not only for business, but this also helps us in gaming or enhancing other multimedia experiences.
When you try dual monitor setup on Windows 10, sometimes it just gets configured without any hassle while there are chances that your second monitor not detected. If your Windows 10 is not detecting the second monitor, you may also try to Mirror your Windows 10 screen on your TV to extend your dual monitor. Here are a few quick fixes if your second monitor is not detected or you are unable to configure dual monitor setup on Windows 10.
Troubleshooting Hardware Connections
To configure a dual monitor setup on Windows 10, first, we need to ensure that the hardware setup is configured correctly and the devices are ready to sync.
- Turn off all the devices including your computer and both the monitors/display units.
- Connect all the required cables to be ready to read the connections between the monitor and the graphic card at the back of the tower.
- Restart the devices to establish a connection between all the devices including your secondary display.
- Check if the correct input mode is selected on the monitor’s built-in controller settings.
- If you don’t see the power/display on the monitor, disconnect and reconnect the cables on the monitor to reset the connection.
- There can be an issue with the faulty cable as well. Use an alternative cable to check if the cable is not the culprit behind the connectivity issue.
- Try switching between ports if there are multiple ports on the monitor or the graphic card.
- Connect the monitor to another computer to guarantee that the monitor is not faulty.
- Connect another monitor to this computer to ensure that the problem is not with the graphics card.
- If all the connections are proper and the devices are getting power, you may proceed with the software troubleshooting to check configuration settings.
Configuring Software Settings
If the above troubleshooting did not configure your dual monitor setup on Windows 10, follow the below steps to check the software settings.
Detecting Wired Display
Step 1. Click on the ‘Start’ button and then the gear icon to open the ‘Settings’ window.
Step 2. Click on the ‘System’ option and then select ‘Display’ on the left-hand side menu.
Step 3. Scroll down the page and click on the ‘Detect’ button.
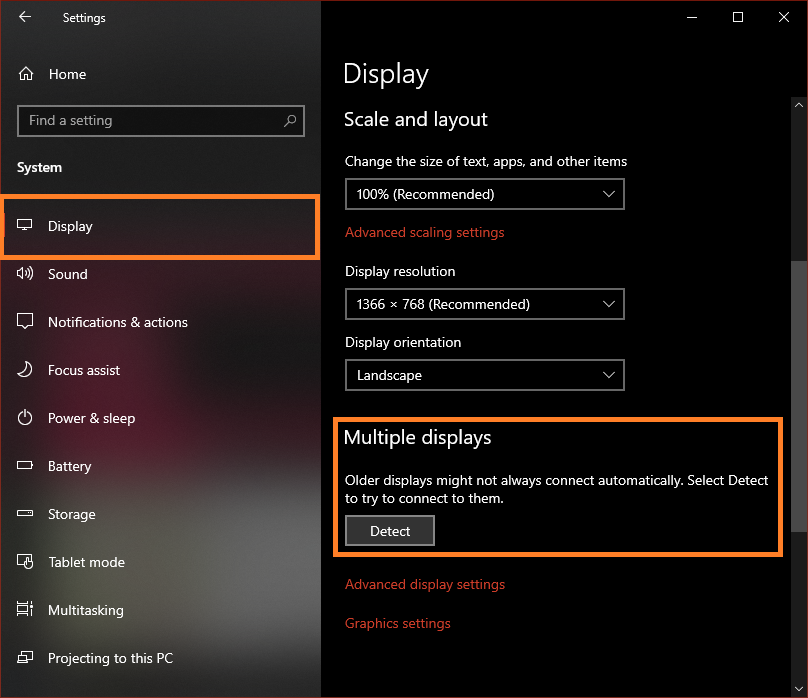
Step 4. Click on the ‘Advanced Display Settings’ to configure the display adaptor properties.
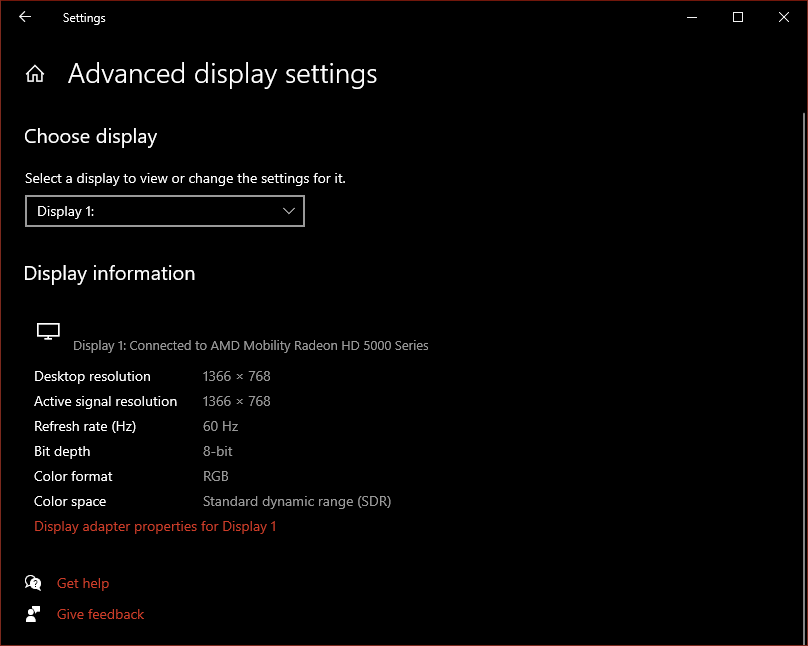
“Please Note: Secondary display will not be enabled or visible until the hardware connection is not configured properly.”
Detecting Wireless Display
If you are trying to configure dual monitor setup on Windows 10 wirelessly, these steps will help you do the same.
Step 1. Click on the Start button and click on the ‘Settings’ icon.
Step 2. Click on the ‘Devices’ option to add a Bluetooth device.
Step 3. Click on the ‘Bluetooth & Other Devices’ in the left-hand side panel and then click on the plus sign with ‘Add Bluetooth & other devices’ written.
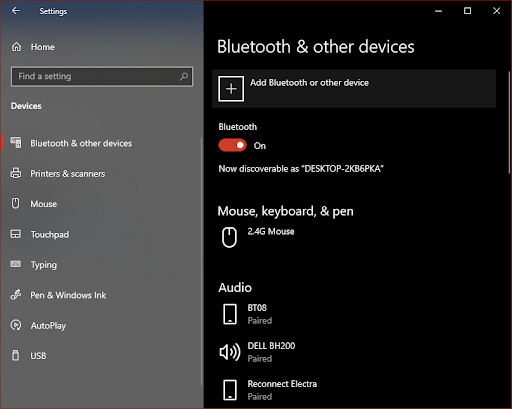
Step 4. Another window will open where you need to select the second option ‘Wireless Display or Dock’ to connect wireless monitors, TVs, PCs with Miracast, or a wireless dock.
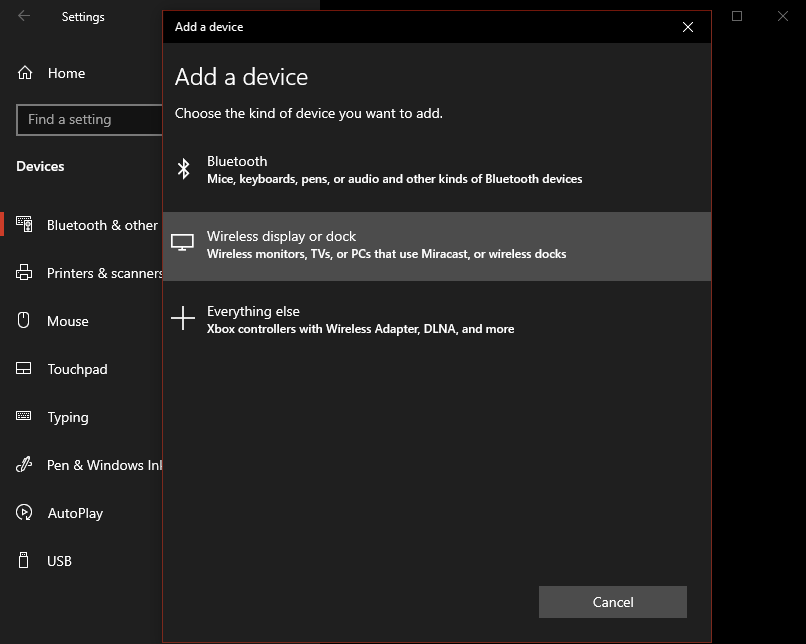
Step 5. It will scan for the available devices connected to the same wireless network. Ensure that your wireless display is powered ON and discoverable.
Step 6. Select the second monitor detected on the scan result and follow the on-screen instructions.
Update Graphics Drivers
If you have tried the above settings but Windows 10 is not detecting the second monitor, you would want to uninstall the faulty drivers or update to the latest graphic drivers.
Step 1. Press Win + R key combination, enter devmgmt.msc in the Run window and press enter.
Step 2. Scroll down the list and look for the ‘Display Adapters’ option. Click on the right arrow next to it to expand the selection.
Step 3. Right-click on the graphic driver and click on ‘Uninstall Device’ option. This step will reinstall your display drivers.
Step 4. Restart the computer for the changes to take effect, and check the device connectivity.
Step 5. If the second monitor is not detected, follow step 1 and step 2 again.
Step 6. Now right-click on the graphic driver and click on the ‘Update Driver’ option.
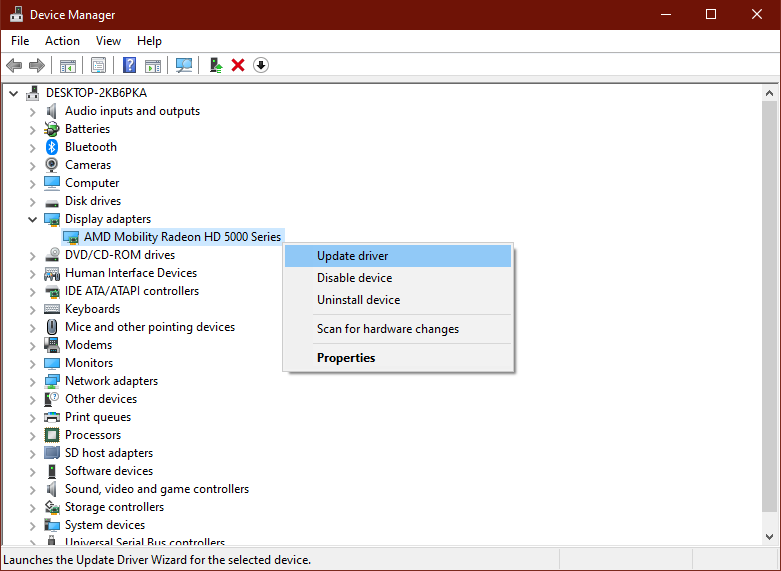
Step 7. Go for the ‘Search automatically for updated driver software’ option on the next screen.
Step 8. If you have Windows Updated turned ON, Windows will automatically check for the best available drivers from the Windows Update Library and install them for the device. Restart the computer for the changes to take effect.
“Please Note: It is recommended to run Windows Update on the system before you try to update the drivers.”
Use Smart Driver Care
Installing device drivers manually is a painful task and at times it becomes difficult to find the right driver and install it manually from the manufacturer’s website. You can make use of one of the best driver updater software to keep all the device drivers of peripherals and connected devices updated to the latest versions.
You can also use one of the best multiple monitor software that can help you easily detect and complete dual monitor setup on Windows 10. Smart Driver Care directly updates the drivers from the Manufacturer’s website. If your second monitor is not detected, this tool can help you update the graphic driver and connect the dual monitor on Windows 10.


