Several companies worldwide have changed their emphasis to or are attempting to move towards automation. The adoption of the CI/CD Pipeline is what plays a significant role in this process. A versatile and powerful DevOps tool is required for the process of building this Pipeline. A successful continuous testing method combines the greatest features of Continuous Delivery and Selenium test automation. This is exactly where Jenkins comes into the picture.
Let us look at the step-by-step process of building a CI/CD Pipeline using Jenkins to move forward with this article.
What is Jenkins?
Jenkins is an open-source, self-contained automation server with integrated plugins designed for Continuous Integration (CI) purposes written in Java. Jenkins can be installed in a few ways; through native system packages, Docker, or even run standalone by any machine with a JRE installed.
Jenkins can automate all sorts of tasks related to building, document, test, package, stage, deploy, static analysis, and much more. It is used to continually build and test software projects, making it easier for developers to incorporate incremental changes and making it easier for users to acquire a fresh build. It also enables us to deliver our applications continuously by integrating with multiple testing and deployment tools.
Jenkins achieves Continuous Integration using numerous plugins. Just install relevant plugins for that tool to integrate a particular tool. Git, SonarQube Scanner, Selenium, Unleash Maven, Pipeline Maven Integration, Docker, and more might be some of these plugins. We could also write our plugin using Extend Jenkins and turns out to be the best fit tool for building a CI/CD Pipeline because of its flexibility, openness, plugin-capabilities, and simple-to-use nature.
How to install Jenkins?
The first pre-requisite to install Jenkins to have JAVA installed on the machine.
1. Install JDK ( Java Development Kit )
- Download JDK8 and choose 32-bit or 64-bit Windows OS according to your system configuration.
- Click on ‘Accept the license agreement’.
2. In the system properties, set the Environmental Variables for the installed JDK version.
- Go to ‘System Properties’, → Under the ‘Advanced’ tab, → Choose ‘Environment Variables.’
- Under ‘System Variables’, → Select ‘New.’
- Copy the path of the JDK folder into the corresponding field.
- For JRE, configure similarly.
- Under ‘System Variables’, → Set up a bin folder for JDK in PATH variables.
- Verify if Java has been successfully installed by giving the below command, eg.
C:\Users\java -version
Download and Install Jenkins
- Download Jenkins. Under LTS, click on windows.
- After the file is downloaded, unzip it. Click on the folder and install it. Select “finish” once done.
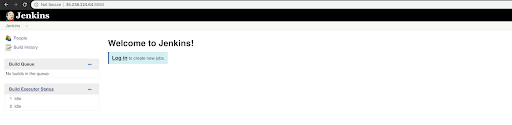
4. Run Jenkins on ‘Localhost:8080’
- Once Jenkins is installed, open the web browser and type “localhost:8080”.
- Enter login credentials.
- If it is the first time Jenkins is installed on your machine, the dashboard will suggest installing the recommended plugins. Install all the recommended plugins.
5. Jenkins Server Interface
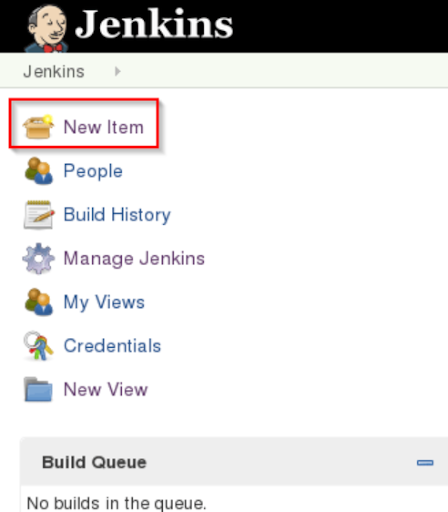
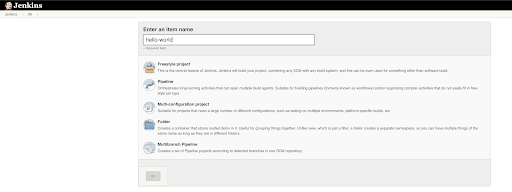
- To create a new project, → Go to ‘New Item’. This allows you to create a new project.
- To check the status of your builds, → Go to ‘Build History’.
- Jenkins server interface allows for managing various configurations the system deals with.
6. Build and Run a Job on Jenkins
- Select a ‘New item’ (Name – Jenkins_trial). Choose a ‘Freestyle project’ and click OK.
- Under the ‘General tab’, -> Provide a description like “This is my first demo Jenkins job.”
- Under the ‘Build Triggers’ tab, → Select the ‘Add build step’ and then click on ‘Execute Windows batch command.’
- In the command prompt enter: echo “This is my first demo Jenkins project: %date%: %time% ” in the command box. Click on apply and then save.
- Select ‘Build’ now.
- Build History helps you check build status, and we can see a building history created for this job. By clicking on that, in the console output, you can see the first Jenkins job’s output with time and date.
Congratulations, you have just installed Jenkins on your Windows system and verified that with a demo job!
Building CI/CD Pipeline with Jenkins
Basic CI/CD Pipeline
Pre-requisites for building CI/CD Pipeline:
- Java Development Kit:
- If you don’t have it, the installation steps for JDK are described above.
- It is important to add it to the environment path so that the Java command can be executed via terminal.
- Primary knowledge to execute some basic Linux commands through the shell and open browser.
Let us get started with steps to build CI/CD Pipeline with Jenkins:
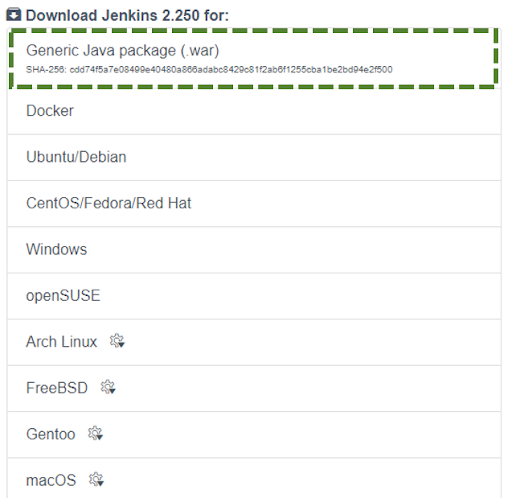
Download Jenkins
- Download Jenkins from the Jenkins downloads page ‘https://www.jenkins.io/download/’ and download the file ‘Generic Java package (.war)’. The reason for using the WAR file is that it is a one-time executable file that is easy to execute and remove.
- Except for step 2, in case you are using another Jenkins distribution, the rest of the below-guided steps should be pretty much the same.
Executing Jenkins as Java binary
- Open the command prompt or your terminal window and enter cd <your path>.
- To run the WAR file, enter command java –jar ./Jenkins. War.
Creating a Jenkins Job
- Open localhost:8080 on the web browser.
- This will invoke Jenkins dashboard where we need to create new jobs.
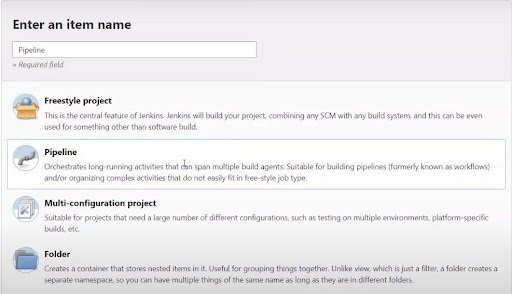
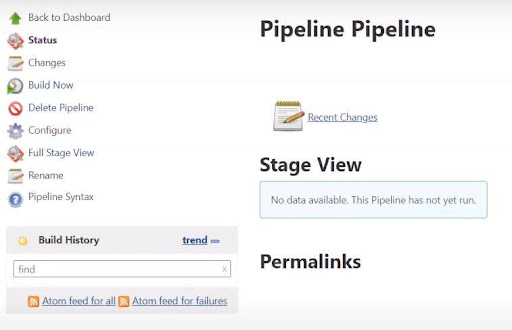
Create a Pipeline Job
- Select and define the Jenkins job that needs to be created.
- Select Pipeline, provide it with a name and then click OK.
- Scroll down and find the Pipeline section.
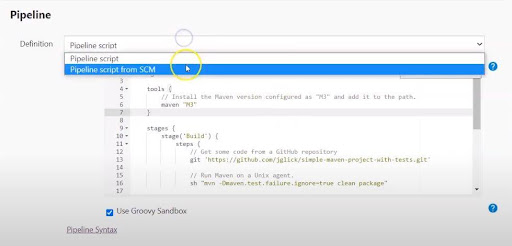
- You can either write a Pipeline script directly or retrieve the Jenkins file from SCM.
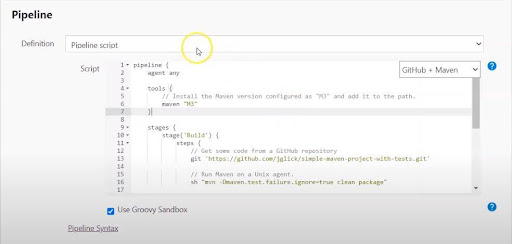
Configuring and Executing a Pipeline Job With a Direct Pipeline Script
- For executing Pipeline script, select Pipeline script as the Destination and paste the Jenkins file content in the Script from GitHub. Save the changes.
- Next click on the Build Now to process the build.
- To verify the output, click on any stage and click Log; a message will appear on the screen.
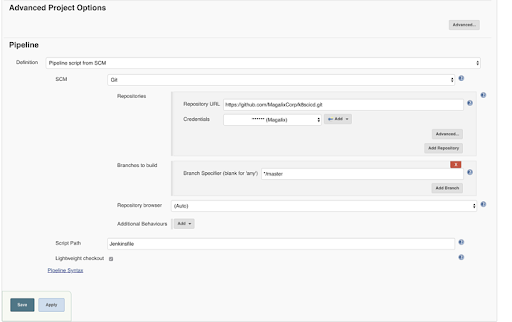
Configuring and Executing a Pipeline With SCM
- Copy the GitHub repository URL.
- Next, click on ‘Configure’ to modify the existing job in Pipeline.
- Go to the Advanced Project Options setting, → Choose Pipeline script from the SCM option.
- Paste the GitHub repository URL in this option.
- Type Jenkinsfile in the Script, and ‘Save’ it.
- Now, click on ‘Build Now’ to execute the job again.
- In this case of executing a Pipeline with SCM, there will be an additional stage, i.e., Declaration: Checkout SCM.
- To verify the output, click on any stage and click on Log.
Steps to creating a CI/CD Pipeline
These were the essential steps needed to construct a CI/CD pipeline, below hands-on demonstration will serve as a crux of the biscuit after you have learned all the necessary steps to creating a CI/CD Pipeline using Jenkins.
- Go to your Jenkins Portal:
- Click on ‘Create a job’.
- In the ‘Item name’ dialog box, you may enter the ‘Pipeline’.
- Of the several options, choose ‘Pipeline’ job type in the list below.
- Click on OK.
- A set of configurations related to the Pipeline opens on the screen.
- Scroll down on that page to choose GitHub+Maven.
- Next, integrate the Jenkins file into SCM. Select ‘Pipeline script from SCM’.
- In the SCM dialog box, select Git. ‘Jenkins file’ is the name of the Script. Add the Git repository URL. There is a facility to add the credentials while connecting to the repository in SCM.
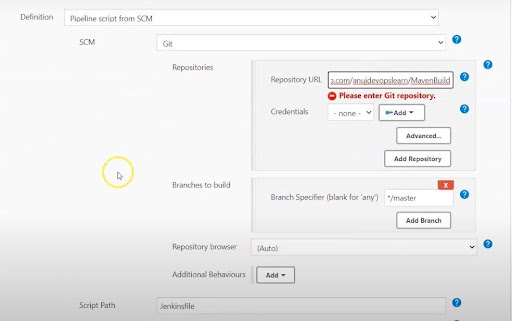
- Add the credentials with the help of the ‘Add’ option. Save the configuration. A page with various options like ‘Build Now’, ‘Delete Pipeline’, ‘Configure’, etc. pops up on the screen.
- Click on the Build Now option. The Pipeline will start downloading and the entire checkout and build process is visible.
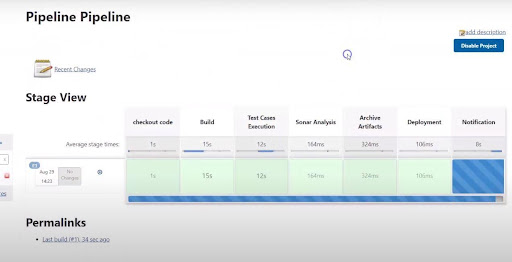
- In the console output option, you can check the log that is taking place.
- The artifact will be present to download once all the segments of the Pipeline are completed. Once completed, the corresponding war file can be downloaded using that link.
- This whole process helps us understand how the entire Pipeline is configured. Next sections will demonstrate different kinds of automation Pipelines that can be configured.
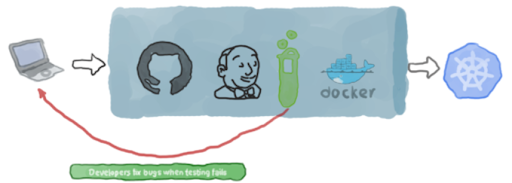
CI/CD Pipeline using Jenkins and Docker
Step 1: In your Terminal or CLI in your VM, Start and enable Jenkins and Docker using the below commands.
systemctl start jenkins
systemctl enable jenkins
systemctl start docker
You can use ‘sudo’ before these commands in case you face privileges error ‘You do not have enough privileges to perform this operation’
Eg. sudo systemctl start jenkins
sudo systemctl enable jenkins
sudo systemctl start docker
Step 2: In your Jenkins console click on New Item from where you will create your first job.
Step 3: Select ‘Freestyle Project’ after you click on New Item, and provide an item name and click ‘OK’.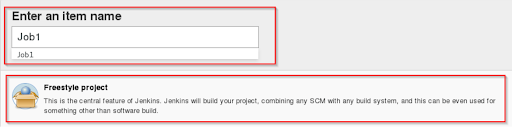
Step 4: Go to the ‘Configuration section’ and select SCM. Add the git repository link and click on ‘Apply’ and ‘Save’.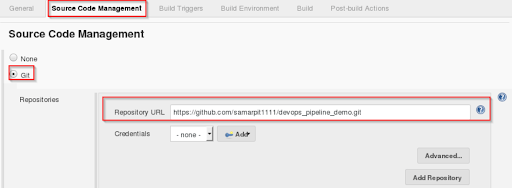
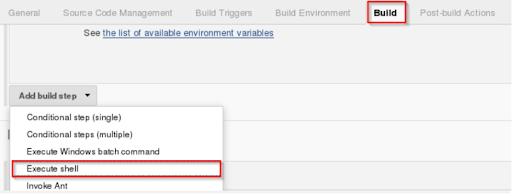
Step 5: Next step is to build the step. Select Build option, —> Execute shell
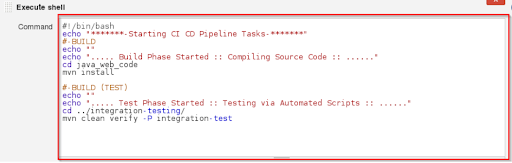
Step 6: In Execute Shell, write the shell commands. This is where the archive file is built to induce a .war file. After that, the code that is already pulled will be obtained and then the package will be installed using Maven. It merely installs the dependencies and the program is compiled.
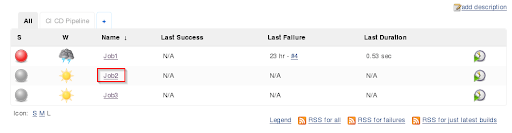
Step 7: Create a new ‘Job’( Freestyle project ) named eg. ‘Job 2’ repeating the same steps as we did above ( Step2 – Step 6).
Step 8: Now provide the shell commands to start the integration phase and build the Docker container.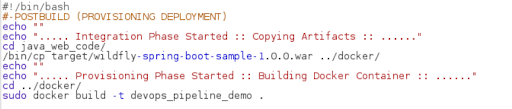
Step 9: Again create a new job ( Job 3) repeating the same steps( Step 2- Step 6 )
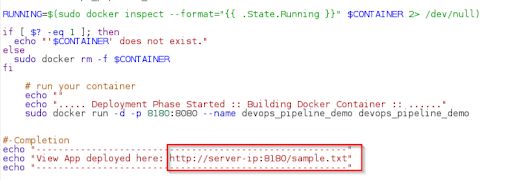
Step 10: Here write the shell commands to verify the Docker container file and to deploy it on port 8180. Click on ‘Save’.
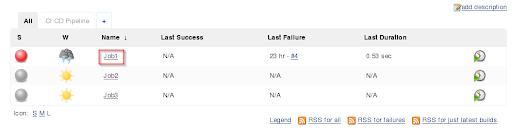
Step 11: It’s time to sequence the jobs created by configuring the occurrence of each job.
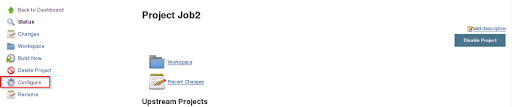
Step 12: Click Job1, → Configure
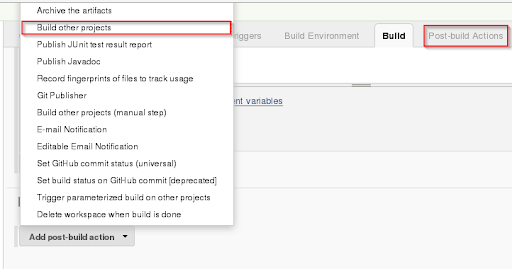
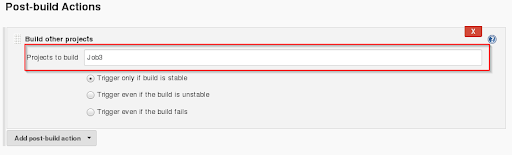
Step 13: Next click Post-build Actions, -> Build other projects.
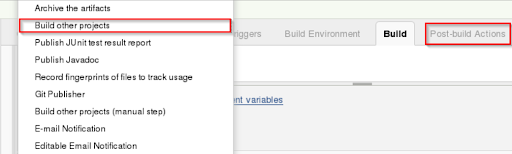
Step 14: Provide the project name next in sequence after Job1 (Job2 in our case) and click on save.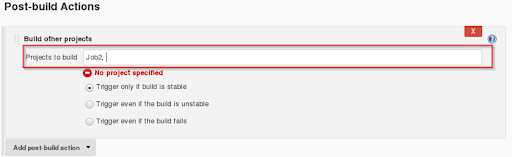
Step 15: Configure next job – Job2
Step 16: From the build actions, You will choose post-build and click on build other projects.
Step 17: Provide the project name next in sequence after Job2 (Job3 in our case) and click on save.
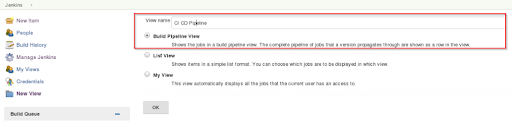
Step 18: Let us create a Pipeline view. Click the ‘+’ sign.

Step 19: Provide ‘Build Pipeline view’ name. ( Name is arbitrary).
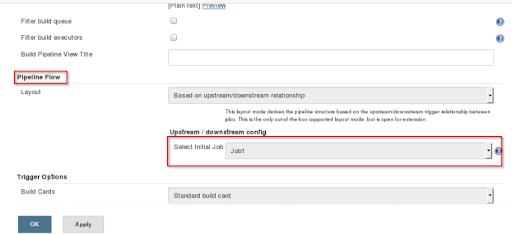
Step 20: Choose the initial job ( In our let’s assume it is Job1) and click OK.
Step 21: Start the CI/CD Pipeline process by clicking on RUN.
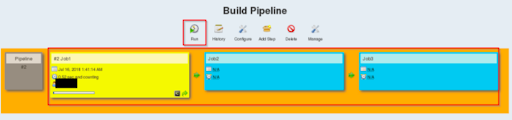
Step 22: Wait for a successful build. After which open the link in your browser localhost:8180/sample.text, this should run the application.

Next, we see a CI/CD Pipeline demonstration using Jenkins + Kubernetes.
CI/CD Pipeline using Jenkins and Kubernetes
In this section, we are building a continuous delivery (CD) Pipeline. Since here we have a very simple application written in Go, we would run only one type of test to test the code.
The pre-requisites for CI/CD Pipeline implementation are:
- A running Jenkins instance. This may be a VM, a cloud instance, a docker container or a bare metal one, or a docker container. The only criteria is, it must be publicly accessible from the internet so that the repository can connect seamlessly to Jenkins via web-hooks.
- Image registry: You can either use Docker Registry, a custom registry or even a cloud-based offering like ECR or GCR.
- An account on GitHub. This is arbitrary. We can also use other repositories like Bitbucket with minor changes.
The Pipeline can be depicted as follows:
Step 1: Sample application code
Below sample application will respond to any GET request with ‘Hello World’.
First step is to create a new file called main.go and include below code:
( You can use play.golang.org to format/run/import the below code just in case there is a copy paste indentation error)
package main
import (
"log"
"net/http"
)

type Server struct{}
func (s *Server) ServeHTTP(w http.ResponseWriter, r *http.Request) {
w.WriteHeader(http.StatusOK)
w.Header().Set("Content-Type", "application/json")
w.Write([]byte(`{"message": "hello world"}`))
}

func main() {
s := &Server{}
http.Handle("/", s)
log.Fatal(http.ListenAndServe(":8080", nil))
}
As mentioned we shall have only one test since this application is simple.
Create a new file ‘main_test.go’ in the same repository and enter following code:
package main
import (
"log"
"net/http"
)

type Server struct{}

func (s *Server) ServeHTTP(w http.ResponseWriter, r *http.Request) {
w.WriteHeader(http.StatusOK)
w.Header().Set("Content-Type", "application/json")
w.Write([]byte(`{"message": "hello world"}`))
}

func main() {
s := &Server{}
http.Handle("/", s)
log.Fatal(http.ListenAndServe(":8080", nil))
}
Here we use a few other files that help us deploy the application.
Dockerfile: This is where the application is packaged.
- Dockerfile is a multistage one. This ensures that the image size is as small as possible.
- The first build image is based on golang:alpine. It creates a binary.
- The resultant binary is used in the second image, which is just a scratch one.
- A ‘scratch image’ contains no dependencies or libraries. It has just the binary file that starts the application.
FROM golang:alpine AS build-env
RUN mkdir /go/src/app && apk update && apk add git
ADD main.go /go/src/app/
WORKDIR /go/src/app
RUN CGO_ENABLED=0 GOOS=linux go build -a -installsuffix cgo -ldflags
'-extldflags "-static"' -o app .

FROM scratch
WORKDIR /app
COPY --from=build-env /go/src/app/app .
ENTRYPOINT [ "./app" ]
A Service
For a compliant CI/CD implementation, we would need at least a ‘Service’ and a ‘Deployment’ because we are using Kubernetes as the platform on which we host this application. Our file on service.yml looks like this,
( You can go to https://onlineyamltools.com/edit-yaml to edit and save your yaml files.)
apiVersion: v1
kind: Service
metadata:
name: hello-svc
spec:
selector:
role: app
ports:
- protocol: TCP
port: 80
targetPort: 8080
nodePort: 32000
type: NodePort
This is a simple ‘Service’ that uses NodePort as a Service type. It listens on port 32000 on the IP address of any cluster nodes. The incoming connection is transferred to the pod on port 8080. For internal communications, the Service is set to listen on port 80.
Deployment
Once an application is dockerized, it can be deployed to Kubernetes through a Deployment resource. The deployment.yml file looks as follows:
apiVersion: apps/v1
kind: Deployment
metadata:
name: hello-deployment
labels:
role: app
spec:
replicas: 2
selector:
matchLabels:
role: app
template:
metadata:
labels:
role: app
spec:
containers:
- name: app
image: ""
resources:
requests:
cpu: 10m
Here in the image part of the deployment definition we are using a variable instead of hardcoding the image name and tag. In the later section, we would see how we can use this definition as a template for Ansible and substitute the image name or any other parameters of the Deployment through the command line/terminal arguments.
Deployment playground: Ansible: Playbooks
Here we are utilising ‘Ansible’ as our deployment tool. Other ways to deploy Kubernetes resources include Helm Charts, but Ansible is an effortless option. Ansible makes use of playbooks to organize its instructions. Our playbook.yml file looks as follows:
- hosts: localhost
tasks:
- name: Deploy the service
k8s:
state: present
definition: ""
validate_certs: no
namespace: default
- name: Deploy the application
k8s:
state: present
validate_certs: no
namespace: default
definition: ""
- More on Playbook; It is used to deploy the service and the cluster’s resources.
- It is imperative that we use our definition files as templates where variables can be supplied from outside, so we need to insert data into the definition file on the fly during execution.
- The Ansible features a lookup function for this purpose, where you can transfer a valid YAML file as a reference. Ansible accepts many ways in which variables are injected into models. We are using the command-line approach in this particular lab.
Ansible includes the k8s module for handling communication with the Kubernetes API server. So, we need not have kubectl installed. Although, we do need a valid kubeconfig file for connecting to the cluster.
Step 2: Install Jenkins, Ansible, and Docker
- Ansible installation :
-
- It is used to deploy a Jenkins server and Docker runtime environment automatically.
- We need to install the ‘Openshift Python’ module to enable Ansible to connect with Kubernetes.
- One advantage of using Ansible is its installation is much easier; all you need to do is install Python and use pip to install Ansible.
-
-
- Get logged to the Jenkins instance
- As mentioned above, install Python 3, Ansible, and the openshift module:
sudo apt update && sudo apt install -y python3 && sudo apt install -y python3-pip && sudo pip3 install ansible && sudo pip3 install openshift - In a default configuration, pip performs installations of binaries under a hidden directory in the user’s home folder. It is necessary that we add this directory to the $PATH variable so that we can easily call the command:
echo “export PATH=$PATH:~/.local/bin” >> ~/.bashrc && . ~/.bashrc - Install the ‘Ansible role’ which is necessary for deploying a Jenkins instance through:
ansible-galaxy install geerlingguy.jenkins - Install the Docker role through:
ansible-galaxy install geerlingguy.docker - Create a playbook.yaml file and insert the following code:
-
- hosts: localhost
become: yes
vars:
jenkins_hostname: 35.238.224.64
docker_users:
- jenkins
roles:
- role: geerlingguy.jenkins
- role: geerlingguy.docker
-
-
- Now, Run the playbook through following command:
ansible-playbook playbook.yaml.
- Now, Run the playbook through following command:
-
-
-
- Instead of a local IP Address, if you are using DNS, you may need to replace this with the DNS name of the instance.
- In case of any firewall settings, you must enable port 8080 on the firewall before running the playbook.
- In a no time, Jenkins should be installed. We can verify this by navigating to the IP address or the DNS name of the machine and specifying port 8080.
- Log in to the Jenkins instance using ‘admin’ as both username and password. Point to be noted is these are the default credentials set by the Ansible role that we used. We need to change these default credentials while using Jenkins in production. This can be achieved by setting the role variables. For this you can refer to the role official page.
- Jenkins is incomplete without plugins. So, the last thing you need to do is install the following plugins that will be used here to create the pipeline:
-
-
-
-
- Git
- GitHub
- CloudBees Docker Build and Publish
- Pipeline
-
-
Step 3: Configuration of Jenkins User to Connect to the Cluster
We presume that you already have an up and running Kubernetes cluster. To allow Jenkins to link to this cluster, we need to add the kubeconfig file required. We are using a Kubernetes cluster in this particular lab that is hosted on Google Cloud, so we are using the gcloud order. Maybe your particular case is different. But in both situations, the kubeconfig file needs to be copied to the Jenkins user directory as follows:
$ sudo cp ~/.kube/config ~jenkins/.kube/
$ sudo chown -R jenkins: ~jenkins/.kube/
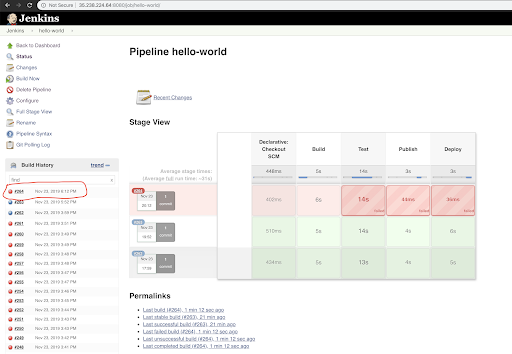
Step 4: Creating a Jenkins Pipeline Job
In this step we create a new Jenkins job. Select type as ‘Pipeline’. The job settings should look like,
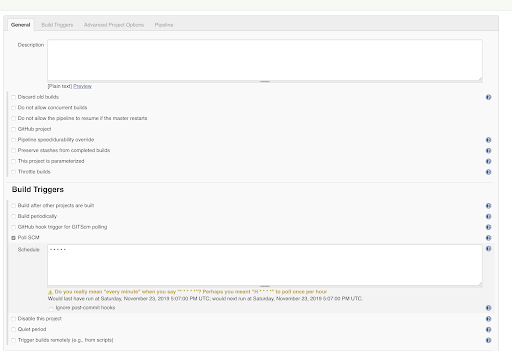
Few modified settings:
- Here we used the Poll SCM as the build trigger.
- Setting this option basically instructs Jenkins to check the Git repository periodically (every minute as indicated by * * * * *).
- If the repository has been changed since the last poll, the job is triggered automatically.
- In the Pipeline itself, the repository URL and the credentials are specified. The branch is master.
- Here, we added all the job’s code in a Jenkinsfile that is stored in the same repository as the code.
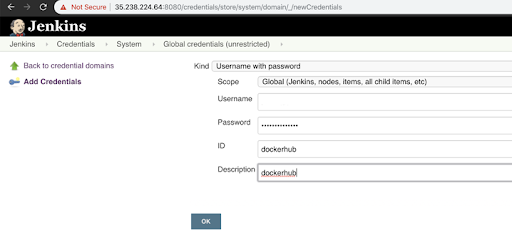
Step 5: Configuring Jenkins Credentials for GitHub and Docker Hub
- Go to /credentials/store/system/domain/_/newCredentials.
- Add the credentials to both targets i.e. GitHub and Docker Hub.
- Provide a meaningful ID and description to both because you will refer them later.

Step 6: Creating the JenkinsFile from the code
The Jenkinsfile in a very crucial part of Jenkins. It is what instructs Jenkins about how to ‘Build’, ‘Test’, ‘Dockerize’, ‘Publish’, and ‘Deliver/Deploy’ our application. Our Jenkinsfile looks like,
Pipeline {
agent any
environment {
registry = "magalixcorp/k8scicd"
GOCACHE = "/tmp"
}
stages {
stage('Build') {
agent {
docker {
image 'golang'
}
}
steps {
// Create our project directory.
sh 'cd ${GOPATH}/src'
sh 'mkdir -p ${GOPATH}/src/hello-world'
// Copy all files in our Jenkins workspace to our project directory.
sh 'cp -r ${WORKSPACE}/* ${GOPATH}/src/hello-world'
// Build the app.
sh 'go build'
}
}
stage('Test') {
agent {
docker {
image 'golang'
}
}
steps {
// Create our project directory.
sh 'cd ${GOPATH}/src'
sh 'mkdir -p ${GOPATH}/src/hello-world'
// Copy all files in our Jenkins workspace to our project directory.
sh 'cp -r ${WORKSPACE}/* ${GOPATH}/src/hello-world'
// Remove cached test results.
sh 'go clean -cache'
// Run Unit Tests.
sh 'go test ./... -v -short'
}
}
stage('Publish') {
environment {
registryCredential = 'dockerhub'
}
steps{
script {
def appimage = docker.build registry + ":$BUILD_NUMBER"
docker.withRegistry( '', registryCredential ) {
appimage.push()
appimage.push('latest')
}
}
}
}
stage ('Deploy') {
steps {
script{
def image_id = registry + ":$BUILD_NUMBER"
sh "ansible-playbook  playbook.yml --extra-vars \"image_id=${image_id}\""
}
}
}
}
}
The file is easier than it looks. The Pipeline contains four stages:
- The Build is where we build the Go binary and ensure that nothing is wrong in the build process.
- The Test is where we apply a simple UAT test to verify that the application works as expected.
- Publish, is where the Docker image is built and pushed to the repository. After that, any environment can use it.
- Deploy, this is the finale step where Ansible is invoked to contact Kubernetes and apply the definition files to deploy the application.
It’s time to test our CD Pipeline
The last part of this section is where we test our work. The code is committed to GitHub and is ensured that our code moves through the Pipeline until it reaches the cluster. Following steps are followed.
- Add the code files: git add *
- Commit the code changes: git commit -m “Initial commit”
- Push the code changes to GitHub: git push
- On Jenkins, there are two options to perform Build. We can either wait for the job to get triggered automatically, or we can just click on “Build Now”.
- If the build of the job is successful, we can examine our deployed application using the following commands.
- Get the node IP address:
kubectl get nodes -o wide
NAME STATUS ROLES AGE VERSION INTERNAL-IP EXTERNAL-IP OS-IMAGE KERNEL-VERSION CONTAINER-RUNTIME
gke-security-lab-default-pool-46f98c95-qsdj Ready 7d v1.13.11-gke.9 10.128.0.59 35.193.211.74 Container-Optimized OS from Google 4.14.145+ docker://18.9.7
-
- Next, initiate an HTTP request to our app:
$ curl 35.193.211.74:32000
{"message": "hello world"}
Let us make an intentional error in our code and ensure that the Pipeline will not ship faulty code to the target environment.
Change the message to “Hello World!”, ‘H’ is capital here with an exclamation mark at the end. Since this is not what is intended by our client, the Pipeline should stop at the Test stage.
The new main.go file looks like,
package main

import (
"log"
"net/http"
)

type Server struct{}

func (s *Server) ServeHTTP(w http.ResponseWriter, r *http.Request) {
w.WriteHeader(http.StatusOK)
w.Header().Set("Content-Type", "application/json")
w.Write([]byte(`{"message": "Hello World!"}`))
}

func main() {
s := &Server{}
http.Handle("/", s)
log.Fatal(http.ListenAndServe(":8080", nil))
}
Next, let’s commit and push our code:
$ git add main.go
$ git commit -m "Changes the greeting message"
[master 24a310e] Changes the greeting message
1 file changed, 1 insertion(+), 1 deletion(-)
$ git push
Counting objects: 3, done.
Delta compression using up to 4 threads.
Compressing objects: 100% (3/3), done.
Writing objects: 100% (3/3), 319 bytes | 319.00 KiB/s, done.
Total 3 (delta 2), reused 0 (delta 0)
remote: Resolving deltas: 100% (2/2), completed with 2 local objects.
To https://github.com/MagalixCorp/k8scicd.git
7954e03..24a310e  master -> master
But in Jenkins, we should see the build has failed.
By clicking on the failed build/job, we can observe the reason why it failed.
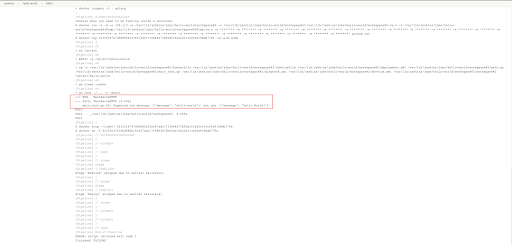
This is to ensure that our faulty code is never routed to the target environment. Thus we mitigate any foreseen error before deploying the code to the target environment!
With Kubernetes deployments, the best part here is that even when we alter the container image, we ensure zero downtime for the application. This is possible since the rolling update approach is used by the Deployment procedures by default to terminate and restore containers one at a time. And only when the new container is up and running does the Deployment terminate the old one.
CI/CD, adopting the Agile approach, is an integral part of every modern world. You can ensure a smooth transfer of code from the version control system to the target environment (testing/QA/staging/production/etc.) through pipelines, while implementing all the testing and quality control practices required.
Best practices to build a CI/CD Pipeline with Jenkins
CI/CD is usually associated with DevOps, DevSecOps, GitOps, AI for IT operations (AIOps), etc. It is not always enough to say we are implementing CI/CD; some best practices can be coupled to make the CI/CD Pipelines more efficient and help you become more competitive.
The phrase “best practices” in CI/CD suggests the way monitoring is configured to support design and deployment in addition to steps, processes, iterations that should be improvised to attain great software delivery results.
A deployment CI/CD Pipeline is a good demonstration of automating the steps to build, test, and deploy. Its achieves automating deployment through:
- By using a tool/platform to automate individual steps/tasks, resulting in a toolchain (a string of automated tasks).
- By using a tool to orchestrate this toolchain
- By continually expanding and improving this toolchain
CI/CD best practices include a combination of an effective deployment Pipeline and orchestration tools, such as Jenkins, Azure, GitLab thereby resulting in increased velocity, reduced risk of human error, and enabling self-service.
Version control
- Employing ‘Shared version control’ is a best practice that provides a single repository for all teams starting with development, QA, release management, operations, information security.
- It is essential that version control must be secured, have encrypted repositories, signed check-ins, and separation of duties (e.g., two people committing simultaneously).
- Version control include,
QA and Testing
- Deployment Pipelines must perform rigor testing to mitigate defects with a sense of urgency and achieve zero downtime. Drift focus on quality-related principles, as:
- ‘Shift left’ testing.
- Deploying in smaller batches, frequent releases, and learning from escaped defects.
- 5 layered security testing
- Achieving maximum code coverage
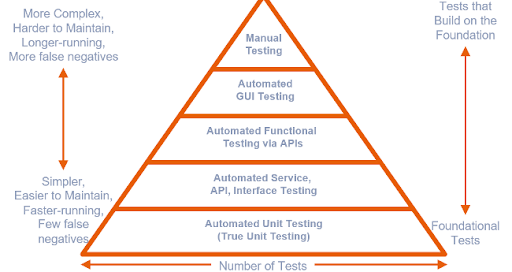
- Testing should encompass code specific and automated testing specific tools.
- Common code-analysis tools include:
-
-
- Language specific
– Python: Pylint & Pyflakes
– Java: PMD, Checkstyle
– C++: Cppcheck, Clang-Tidy
– PHP: PHP_CodeSniffer, PHPMD
– Ruby: RuboCop, Reek - Code Audit specific
– SonarQube: 20+ languages
– Security scanners
– Complexity analyzers
- Language specific
-
-
- Common automated testing tools include:
- Unit testing
– JUnit, NUnit - Functional or performance testing
– HP ALM
– Cucumber
– Selenium - Security testing
– Penetration test tools
– Active analysis tools
- Unit testing
- Common automated testing tools include:
Testing your processes
- Answers to these small, simple questions help achieve more significant results!
- How often do developers check-in into the trunk? Ensure it is once a day.
- Does every check-in initiate an automated build and testing, covering both unit & regression testing?
- How fast can we repair a broken build or failed test?
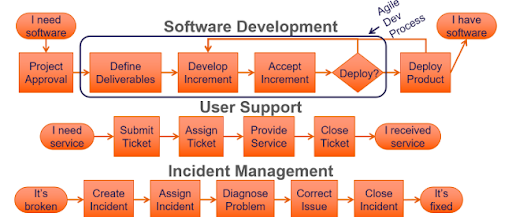
Value stream and value-stream mapping
When attempting to solve issues, defining value sources, and then mapping them will benefit a company and teams. It also helps to create value for clients through activities that take a product or service to the consumer from the beginning. Examples of value sources include:
- Software development
- User support
- Incident management
Infrastructure as code(IaC)
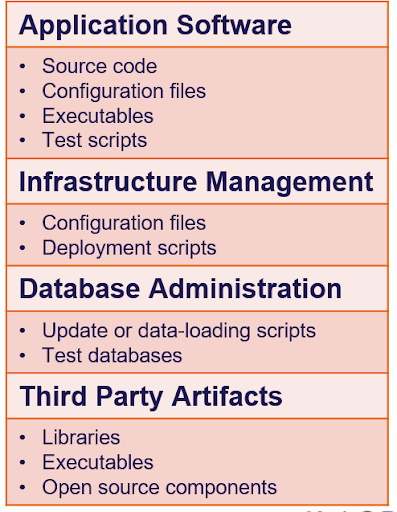
Infrastructure as code (IaC) benefits CI/CD Pipelines in many ways, such as:
- Providing visibility about application and infrastructure dependencies.
- Allowing testing and staging in production-like environments at an early stage in development projects that enhance agile teams ‘definition of done’ by mitigating issues forehand.
- The Infrastructure is more convenient to build than to mend.
- Physical systems: Wipe and reconfigure
- Virtual and cloud: Destroy and recreate
- Complying with the ideal continuity plan and recovery plan.
Amplify feedback
Another CI/CD best practice is building the capacity to amplify feedback. The efficiency of a single system to work safely in complex systems is:
- Managing in a way expose errors in design and operation
- Swarm and solve problems resulting in quick response
- Advocating new local knowledge explicitly globally across the organization
- Creating leaders who continue these conditions
Best practices include winning and losing, quickly failing, removing obstacles, fine-tuning systems, using popular tools to break complex software, and more importantly, driving people to respond in ways that quickly solve problems, are decisive and creative and innovative.
It’s about shifting your mindset to fulfill what’s promised in ways that delight and deliver value.
LambdaTest Integration to resolve CI/CD pipeline challenges
Shared testing environments are coupled with many continuous deployment challenges. In the application development projects where several parallel testings are in process, developers across teams concurrently commit code to the same CI environment. This could result in environment configuration issues as different tests might require different environment configurations.
Poor configuration of the shared testing environment often translates into failed tests & in-turn into failed. This weakens the strength of CI/CD approach, which is quicker iterative development.
The most sort after solution to this could be on-demand or on-need-basis dedicated testing environment creation in the cloud. One such platform like LambdaTest’s Selenium automation testing might bring relief to testing teams facing CI/CD challenges like diverse environment needs or inefficient implementation.
LambdaTest is a cross browser testing platform. It enables you to interactively test your web and mobile applications on all major browsers for different mobile OS like Android, iOS, along with desktop environments like Mac, Windows, etc.
LambdaTest provides you out-of-the-box automated UI testing solutions to easily integrate with a suite of applications, from bug logging to project management tools & dashboards. Also, as already mentioned, LambdaTest integrates with CI tools of your choice to make automated testing a seamless experience for you.Cloud-based automation testing platforms allow easy integration with CI/CD tools and help in overcoming the CI/CD challenges.
Step by Step process to integrate Jenkins Pipeline With Cloud Selenium Grid
In this section, we shall see how in no time can we use LambdaTest with Jenkins to attain a seamless automated testing experience. We already know Jenkins offers a variety of plugins for diverse operations and utilities.
To get going with Jenkins test automation with Selenium, the LambdaTest Jenkins plugin is one such plugin to help you speed up the automatic browser testing. The LambdaTest Jenkins plugin helps us easily customize our test documents by connecting the Jenkins CI model to the LambdaTest Selenium grid.
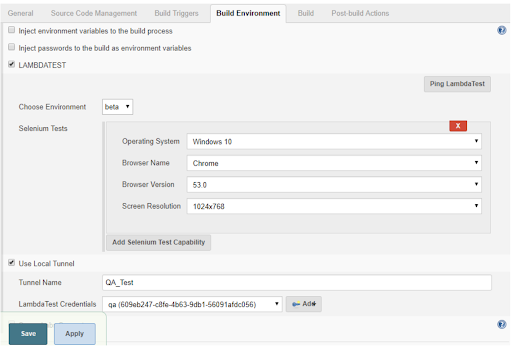
The Jenkins + LambdaTest integration will enhance your testing and improve your test coverage by,
- Configuring the credentials for LambdaTest and the job scheduled with Jenkins.
- Performing a setup and tearing down the binary Lambda Tunnel file to conduct automated cross-browser testing even on your local web applications.
- Providing all test data, such as video logs, network logs, and screenshots, in each of the steps performed at various stages with your Jenkins job via LambdaTest.
To proceed with the automation, it is necessary to acquire valid access to,
- LambdaTest account.
- An existing versioned server with the Jenkins CI (version 2.138.2+)
- A root-access enabled Jenkins Client.
Installation and configuration of LambdaTest Jenkins Plugin
Before proceeding with installation:
- It is required that you have administrator rights to have the administrator level access.
- Be sure to have no active build jobs in execution or queue.
LambdaTest Jenkins Plugin Installation guide.
Step 1: First, Go to Manage Jenkins → Manage Plugins.
Step 2: Go to Available tab.
Step 3: Perform a search for ‘LambdaTest’ in the filter search box on the left side of the screen.
Step 4: Scroll down the list of plugins to select LambdaTest Automation Plugin.
Step 5: Installation will only start if we select the checkbox in front of LambdaTest Automation Plugin.
Step 6: Once selected and after the successful installation of the plugin, it is available under Installed tab.
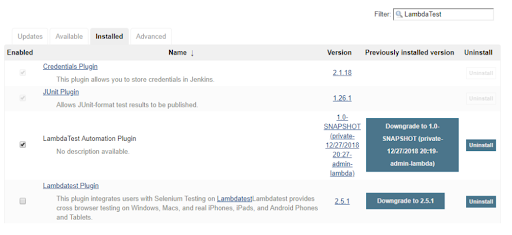
If you don’t find LambdaTest under your available set of plugins section, refresh the Jenkins plugin list by simply clicking on the Check Now button, and you will get a fresh list of plugins from the Jenkins update center. This is a usual observation where newly installed plugins fail to synchronize with your existing Jenkins plugins that are fetched from Jenkins update center.
After successful LambdaTest Jenkins plugin installation, we would need to integrate our Selenium WebDriver tests with Jenkins by configuring the LambdaTest credentials in the Jenkins CI server. This is an essential step if we want to move ahead with Jenkins test automation using Selenium or even to perform automated cross-browser testing.
Configuring LambdaTest Credentials
We need to work with Jenkins UI to proceed with this Jenkins pipeline tutorial configuration. We don’t have to prepare the script separately from scratch for executing the Lambda Test Platform test. We can reuse our local test script and just add some of the minor configuration changes that will enable us to connect to the cloud platform.
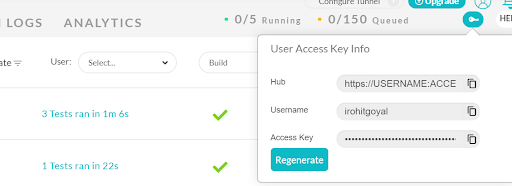
One of the most important and the most vital things for us to connect to the Lambda Test platform is to get our access key token. The access key tokens are a set of private keys that enable us to connect to the cloud platform and execute automated tests on the platform. This access key is unique for everyone and should not be shared with other users. You can fetch and regenerate it from the Profile section of your user account, as shown below.

Alternatively, we can also fetch the access key, username, and hub details from the Automation dashboard. You’ll need to click on the key-shaped icon near the Help button, as shown in the image screenshot below.
This can be set as below in the script-
$ export LT_USERNAME= {your lambdatest username}
$ export LT_ACCESS_KEY= {your lambdatest access_key}
$ set LT_USERNAME= {your lambdatest username}
$ set LT_ACCESS_KEY= {your lambdatest access_key}
Once we have done that, we need to follow the steps below in order to configure it in Jenkins-
- Click Credentials on Jenkins Home Page.
- Select System under the Credentials tab to display the System page
- Select Global Domain credentials (Unrestricted) in the System to open the page for Global credentials.
- Click on Add Credentials to open the credentials page where we add the access details.
- Enter your relevant data in all the fields and click Verify Credentials.
- Then click the Ok button after verification.
- Jenkins generates the ID that appears on the Credential page, and we save the changes.
After successfully attaching your credentials, Jenkins creates an ID. To get this ID for using LambdaTest credentials, you’d need to go to Jenkins’s homepage and click on the Credentials on the navigation screen’s left side.
From the home page of Jenkins, click on Credentials from the menu on the left. LambdaTest credentials can be copied from this ID.
Next, we would need to use the LambdaTest Jenkins plugin to enable LambdaTest Tunnel to perform cross-browser testing on locally hosted web pages or web files.
Creating A Jenkins Pipeline & Running Our First Test
In the last section of this Jenkins pipeline tutorial, we will create a Jenkins CI/CD pipeline of our own and then run our first test. Below is the sample Jenkins File for the Pipeline, which has the required configuration details.
#!/usr/bin/env groovy
node {
    withEnv(["LT_USERNAME=Your LambdaTest UserName",
    "LT_ACCESS_KEY=Your LambdaTest Access Key",
    "LT_TUNNEL=true"]){
    echo env.LT_USERNAME
    echo env.LT_ACCESS_KEY

   stage('setup') {

      // Get some code from a GitHub repository
    try{
      git 'https://github.com/LambdaTest/nightwatch-selenium-sample.git'
      //Download Tunnel Binary
      sh "wget https://s3.amazonaws.com/lambda-tunnel/LT_Linux.zip"
      //Required if unzip is not installed
      sh 'sudo apt-get install --no-act unzip'
      sh 'unzip -o LT_Linux.zip'
      //Starting Tunnel Process
      sh "./LT -user ${env.LT_USERNAME} -key ${env.LT_ACCESS_KEY} &"
      sh  "rm -rf LT_Linux.zip"
    }
    catch (err){
      echo err
   }

   }
   stage('build') {
      // Installing Dependencies
      sh 'npm install'
    }

   stage('test') {
          try{
          sh './node_modules/.bin/nightwatch -e chrome,edge tests'
          }
          catch (err){
          echo err
          }
   }
   stage('end') {
 	echo "Success"
 	}
}
}
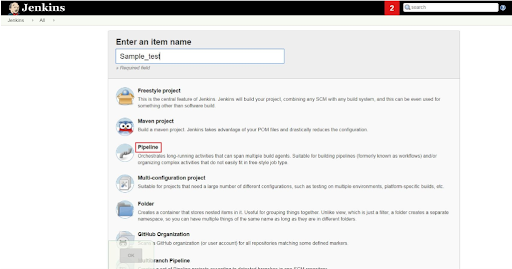
Step 1: We create a New Project for the Pipeline by navigating to Jenkins and then click on New Item.

Step 2: Next, we select Pipeline from the given list of options.
Step 3: Then, we will scroll down to Advanced Project Options and paste the pipeline script code that we saw above into the code pane and hit the Save button.
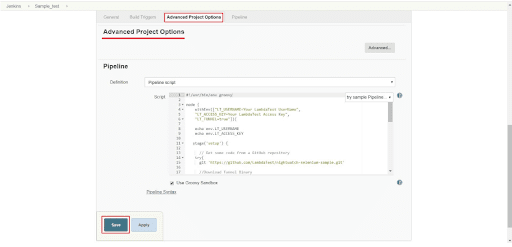
You’re now ready to run your first test using LambdaTest Jenkins plugin.
Step 4: We would need to set up a test build, which can be quickly done via the Jenkins UI by clicking Build Now.
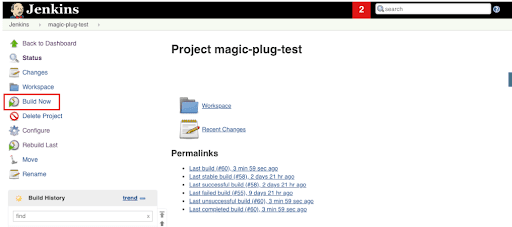
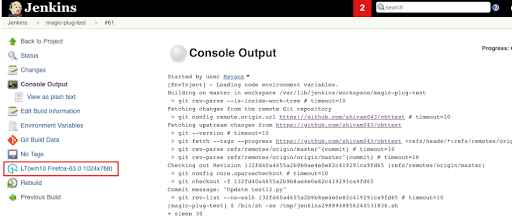
Step 5: We can see a new build generating under the build history as we click on Build Now. The console logs output can be viewed by clicking on the Build.
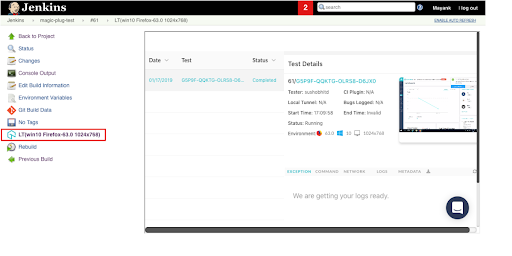
Clicking on LambdaTest Icon on the left will provide more details about the Selenium tests. This will also provide more insight into Jenkins test automation with Selenium, like the test sessions, video logs, etc. on the page loaded.
Ultimately, Building a CI/CD Pipeline is a resilience, persistence, drive, and strength test to automate when it is required and to pull back when it is not. It is all about being able to be determined because your systems, dependencies, teams, customers, and organizations are in the best interest.
This article would have helped you fully understand the basics of the CI/CD Pipeline and the steps to use Jenkins to build a CI/CD Pipeline. We hope that this would help you learn all the essential components to keep in mind while following the steps to create a CI/CD Pipeline.