Remember the feeling of a brand new computer? Those snappy responses, faster boot time and no performance lags despite working with heavy software and programs. Nowadays, almost every computer has fast and large hard drives that support quick operations. However, over time these hard drives can become slow and unresponsive due to unnecessary accumulation of clutter. But don’t fret! Today, we’ll discuss the best ways to enhance hard drive performance on Windows and Mac.
We’ll divide this article into two categories: increase hard drive speed on Windows and increase hard drive speed on Mac. You can skip to the desired section, based on the operating system you need help with.
Increase Hard Drive Speed on Windows
Implement these tactics to make your Windows faster than ever before.
Declutter your hard disk
You’ll be surprised to know that a significant amount of storage is taken up by duplicate photos, videos, documents and other data. So, the very first step in any hard disk cleaning & speed enhancing exercise is the decluttering process.
The market has tons of duplicate file finders & removers like Duplicate Files Fixer, Easy Duplicate Finder, Duplicate Cleaner Pro & more that helps users in easily sorting exact and similar-looking files that are nothing but space-hoggers.
Run advanced system optimizer
Using the Best PC Optimizer is one of the most effective solutions to give your hard disk a significant boost. We highly recommend using Advanced System Optimizer (ASO) to execute a variety of system maintenance and optimization tasks.
To improve overall hard drive performance, Advanced System Optimizer allows users to scan for junk, clear browser cookies, caches, logs, manage startup items, fix broken registry entries and a dedicated one-click-fix to quickly detect and eliminate potential issues that might be hampering speed and performance on Windows 10, 8, 7 PC.
Defragment hard disk
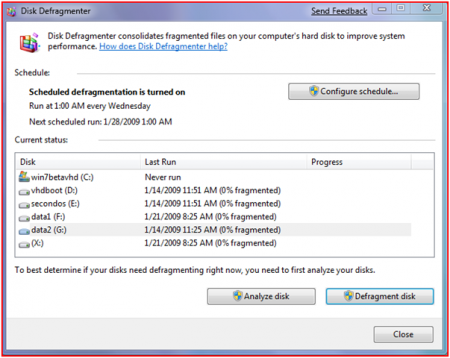
Undoubtedly one of the most widely known workarounds to speed up hard disks and increase overall performance is the defragmentation process. Performing defragging will reorganize the data stored on the hard drive, so that all the relevant pieces of data are collaborated in an aligned fashion. Performing defragmentation should be necessary every once in a while, if you want to drastically increase speed and performance on Windows.
You can either take help of popular Windows Defrag Tools or manually conduct a defragmentation of the hard drive. To do so: Open My Computer > right-click on the disk you wish to defragment and navigate to its Properties. From the Tools tab > hit the Defragment Now button. As soon as you do that, a Disk Defragmenter window will pop-up > click on the Analyze Disk button. This process will tell you whether you should or not defrag your drive. If the results show the message that you should defrag your hard drive, then hit the Defragment button to initiate the process!
Look for potential disk errors
Over time, your hard drive can get exposed to a variety of file system errors or issues related to hardware or software. These HDD problems consequently lead to performance lags and decrease the overall HDD life.
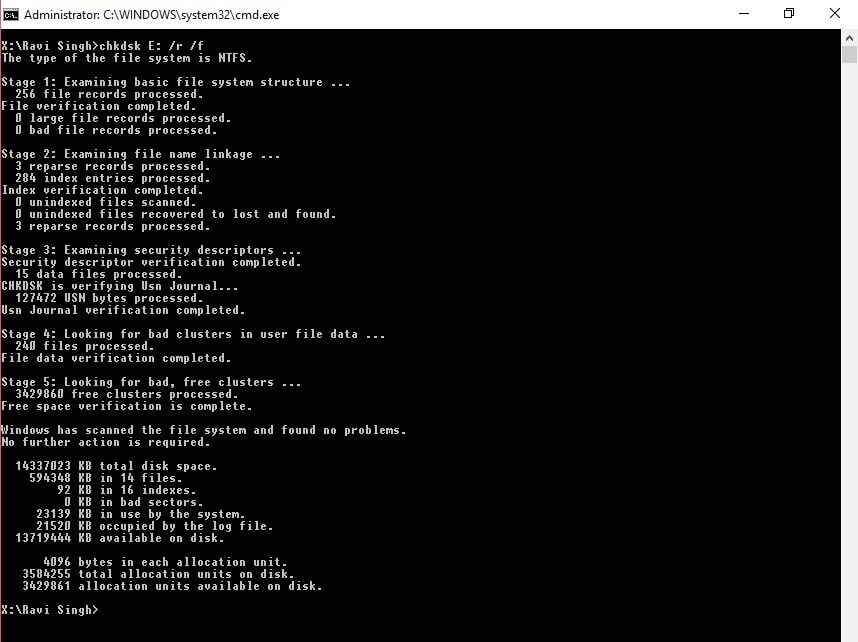
However, we suggest performing a regular Check Disk Scan (chkdsk) to find and fix potential disk errors. To run Chkdsk scan and fix potential drive errors, all you have to do is: Launch Command Prompt & make sure you run it as administrator. Type chkdsk X: /r /f in the CMD window (here X should be replaced with your hard drive letter) > Hit the Enter button to execute the scanning process. If the check disk utility finds any logical errors like bad sectors or any other issue, then it will automatically fix it.
Convert to NTFS
You must already be aware of the fact that NTFS is better than the FAT/FAT32 file system. The first one provides better management features than the latter ones. If you are currently operating on FAT/FAT32 drives, it is suggested to convert them to NTFS and enhance hard drive performance.
To initiate the conversion process, all you have to do is: Launch Command Prompt and execute the convert D: /FS:NTFS command line (here D should be replaced with your hard drive letter) . The entire process is safe to perform and all your data remains as it is.

Enable write caching feature
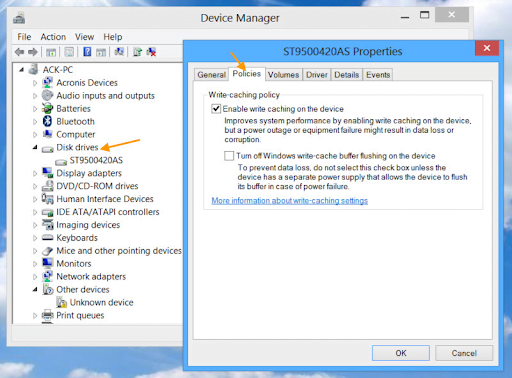
This method is suitable for older computers, including Vista and Windows 7. The OS versions have a useful functionality – Write Caching that allows users to write information in a cache before it can be written on the hard drive. Doing so, a significant improvement in hard drive performance can be witnessed.
The only downside is, you can suffer from data loss issues if the computer shuts down abruptly. In case you still want to proceed, all you need to do is: Navigate to the Windows search bar > type Device Manager and choose the hard drive from Disk Drives. Simply, right-click on it and go to its Properties. From the same menu, head towards the Policies tab and check the box next to enabling write caches. Click the OK button to proceed!
Replace the aging hard drive
In case none of the aforementioned tactics helped you to boost hard drive performance or increase speed, then there’s a high probability that it is a hardware issue which is responsible for slower performance.
In such scenarios, the best bet is to replace the old hard disk with a new and upgraded version. This method will significantly enhance your system speed and you’ll be free from witnessing the common system errors.
Increase Hard Drive Speed on Mac
Implement these tactics to make your Mac faster than ever before.
Limit the number of browsing tabs
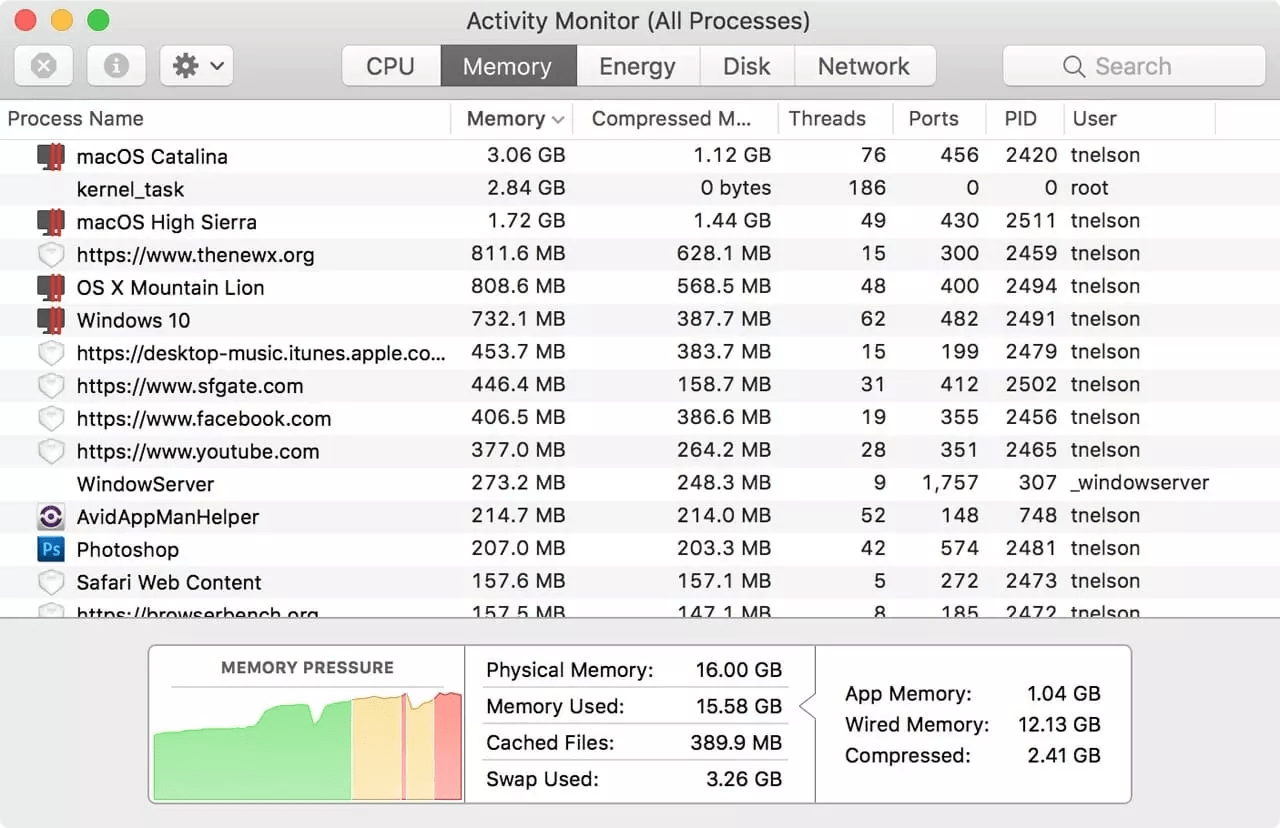
Did you know that most of the memory on your Mac is consumed by the applications you use every day? Especially web browsing! Higher the number of tabs opened, slower the performance will be, since a lot of system resources are occupied.
But, you can take help of Activity Monitor to find out which applications are highly responsible for draining memory on your Mac. You can also disable unnecessary processes running on your Machine using Activity Monitor.
Get rid of unused applications
Another proven workaround to boost Mac speed is to uninstall applications you no longer use. You’ll be able to see how many gigabytes of junk is cleaned by removing unwanted applications. You can easily Trash them, but it won’t be certainly enough if you want to get rid of all the corresponding files that get downloaded with Mac apps.
The best solution to uninstall applications in bulk is Advanced Uninstall Manager. The tool not only supports removing multiple apps & its belonging files but it also helps in managing login items. You can easily enable/disable them to improve boot time of your Mac.
Remove duplicates
Similar to Windows or any other device, Macs are also susceptible to accumulating duplicate files. Hence, removing them from your system and releasing gigabytes of space will help you optimize your Mac and eventually improve your productivity while using the machine.
Duplicate Files Fixer, Disk Drill, Cisdem Duplicate Finder are some excellent options available in the market to find and remove exact & similar-looking images, videos, music files and more.
Eliminate caches
Over time, caches and temp files take up a significant amount of memory on your device and eventually slow your Mac down. Finding and cleaning them can be a cumbersome process. That’s why it is highly suggested to use a dedicated Mac Cleaning Software that can help you clean, optimize and protect your Mac in a few clicks.
Our personal favorite solution in the category is TuneupMyMac. It features one-click cleaning along with tons of optimization modules like Duplicates Finder, Uninstaller, Startup App manager and more to maintain and speed up performance.
Upgrade your memory
Ideally, upgrading memory (RAM) is one of the best ways to improve responsiveness, make applications run faster and improve multitasking. Because almost every computer operation relies on memory, it is important to have it according to your needs & requirements.
Avoid maxing out memory by keeping your Mac free from useless cache files, logs, cookies, unwanted apps, duplicates, old backups, language files and so on. Learn about different memory modules and upgrade RAM accordingly.
These tools and tactics will certainly help you increase hard drive performance on Windows and make your Mac faster than ever before. Try them and let us know which tool or method worked best for you. You can drop a line at support@systweak.com as well!