Off-grid water system lets you produce, store, and treat water independently so your home, cabin, tiny house, or farm never relies on a municipal line. In this guide, I’ll walk you through how off-grid water works from source to tap, what it costs to set up, and how to keep it running for decades with simple maintenance.
I’ll also share practical tips that installers use in the field, common mistakes to avoid, and a realistic budget range for different scenarios.
What is an off-grid water system?
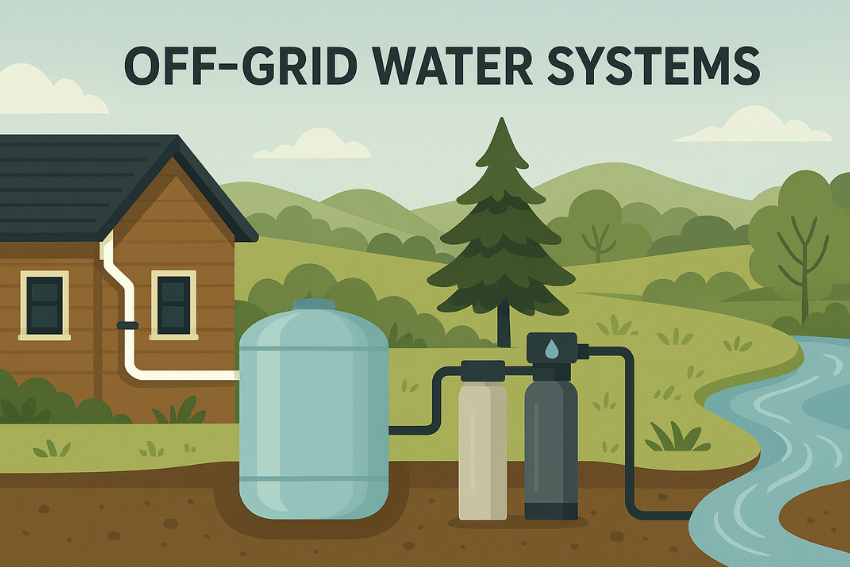
An off-grid water system is a complete loop that captures or draws raw water, stores it safely, treats it to drinking standards, and distributes it through your plumbing without any connection to a city supply. A robust setup usually includes:
- Water sources such as a drilled well, spring box, rainwater harvest roof system, or a surface source like a creek or pond.
- Intake and pre filtration to keep out debris, sand, leaves, and silt.
- Storage above ground or buried tanks sized for several days of demand.
- Treatment stages tailored to your source quality, for example sediment filters, activated carbon, UV disinfection, or reverse osmosis for salty or contaminated supplies.
- Pump and pressure system to deliver water to fixtures at home like a conventional tap.
- Monitoring with gauges, flow meters, and basic water quality tests to keep the system tuned.
The beauty of this approach is control. You decide the quality standard, the redundancy, and how resilient the system remains during power cuts or droughts.
Choosing a water source
Your source drives your design, budget, and maintenance. Here is how to think about each option.
Drilled well
- Pros: Consistent supply, minimal footprint, lower treatment complexity when geology is favorable.
- Cons: Upfront cost and the possibility of low yield or heavy mineral water.
- Watch outs: Test for hardness, iron, manganese, arsenic, and fluoride depending on your geology. Plan for a submersible pump and a pitless adapter in cold climates.
Spring box
- Pros: Gravity fed potential, often excellent taste, low operating energy.
- Cons: Seasonal variability and possible contamination from animals or surface run off.
- Watch outs: Protect the source with a sealed spring box, screened vents, and a diversion ditch uphill to keep surface water out.
Rainwater harvesting
- Pros: Predictable quality after first flush, easy to scale, great for rooftops and small properties.
- Cons: Storage size and seasonal rainfall patterns dictate reliability.
- Watch outs: Use a metal or tile roof, if possible, install leaf screens and a first flush diverter, and keep gutters clean.
Surface water (creek or pond)
- Pros: Abundant supply in wet regions, simple intake.
- Cons: Highest treatment burden due to turbidity and microbes.
- Watch outs: Place intake under the surface to avoid floating debris and sunlit algae layers, and design filtration with multiple stages.
Pro tip: If you mix sources, plumb isolation valves and backflow prevention so each source can be serviced or quarantined without taking the entire system down.
System components and how they fit together
Think of your system as a chain. Each link matters.
Intake and screening
- Foot valve or screened intake prevents large debris.
- First flush diverter for rainwater drops the dirtiest roof runoff.
Pump and pressure
- A submersible pump for wells pushes water up efficiently.
- A jet pump or booster pump can pull from shallow sources or storage tanks.
- A pressure tank smooths flow and reduces pump cycling which extends pump life.
Storage
- Size for at least 3 to 7 days of typical use. A common target is 2000 to 5000 liters for small homes and 10,000 liters or more for families, gardens, and livestock.
- Opaque tanks reduce algae growth. Vent with a screened breather. Include an accessible drain for periodic cleaning.
Filtration
- Sediment: A multistage approach works best. Start coarse at 50 to 100 microns, then 20 microns, then 5 microns to protect carbon and UV stages.
- Activated carbon: Improves taste and removes many organic compounds and chlorine if you treat rainwater with a small chlorine dose before UV.
- Specialty media: Iron or manganese filters for well water, or softeners for hardness control.
Disinfection
- UV disinfection gives whole house coverage without chemicals. Pre filtration is essential to keep UV effective.
- Chlorination offers residual protection in storage tanks. Keep dosing precise and use carbon to polish taste at the point of use.
Distribution
- Use pressure rated PEX or PVC, include shutoff valves by zone, and add a sediment sample tap before and after treatment to simplify troubleshooting.
Powering your off-grid water system
Many people pair water with solar power. A few design rules keep water flowing even on cloudy days.
- Size the pump for head and flow not just horsepower. Account for vertical lift, pipe friction, and desired liters per minute at the tap.
- Use a pressure tank to reduce pump starts. That saves energy and extends pump life.
- Add a small dedicated solar charge controller and battery for the pump logic and UV ballast so brief outages do not take water offline.
- Consider a gravity header tank on a tower or slope to create passive pressure for essential uses if power fails.
How much does an off-grid water system cost?
Budgets vary with geology, access, and quality targets. The ranges below reflect typical homeowner grade systems using durable, widely available components. Prices are ballpark and meant to help you plan.
Well-based system
- Drilling and casing: moderate to high, depending on depth and contractor rates.
- Submersible pump and controls: moderate.
- Pressure tank, plumbing, and trenching: low to moderate.
- Filtration and UV: low to moderate.
- Total typical range for a single family: mid to high five figures for complete drilling plus equipment in challenging geology, less when the well is shallow and productive.
Rainwater harvesting system
- Gutters, leaf screens, first flush diverter: low.
- Storage tank 2000 to 10,000 liters: low to moderate depending on material and size.
- Pump and pressure tank: low to moderate.
- Filtration and UV: low to moderate.
- Total typical range: low to mid five figures for a turnkey package with good storage and full treatment.
Surface water system
- Intake, foot valve, and line: low.
- Multistage filtration and UV: moderate.
- Storage and pump: low to moderate.
- Total typical range: similar to rainwater unless long pipe runs or winterization add complexity.
Cost saver ideas
- Stage your project. Start with storage and basic filtration, then add UV or specialty media as lab tests suggest.
- Use gravity whenever terrain allows to reduce pump size and energy use.
- Choose standardized filter sizes so you can buy cartridges from multiple brands.
Setup steps you can follow
- Assess demand: Count fixtures, people, and uses like laundry, garden, or livestock. Estimate daily consumption and peak flow.
- Test water or model quality: For wells and springs, do a lab test covering minerals, metals, and microbiology. For rainwater, plan for very low minerals but higher organics from roof debris.
- Lay out the system: Draw a simple schematic. Source to intake to pre filter to storage to pump and pressure to treatment to house. Mark valve locations and sample taps.
- Install storage first: Place tanks on a level, compacted pad. Keep them out of direct sun if possible or choose UV stabilized tanks.
- Plumb intake and pre filtration: Add a cleanout and unions so you can service screens and strainers easily.
- Set the pump and pressure gear: Mount the pressure tank upright, install a pressure switch and gauge, and set cut in and cut out pressure based on your fixtures.
- Add treatment: Order filters largest micron to smallest. Ensure you have bypass valves around the treatment train.
- Disinfect and flush: Shock sanitize tanks and lines during commissioning. Flush until chlorine drops to safe levels, then start normal operation.
- Document and label: Label flow direction and valve names. Keep a one-page diagram near the system. Future you will thank you.
Maintenance that keeps water safe and clear
A little routine attention prevents most surprises.
Weekly quick checks
- Glance at pressure, look for drips, and listen for short cycling.
- Check storage level and confirm UV status lights.
Monthly tasks
- Rinse strainers and clean gutter screens for rainwater systems.
- Take a turbidity reading if you have a handheld meter or at least inspect filter housings for excessive sediment.
Quarterly service
- Replace sediment and carbon cartridges based on pressure drop or time in service, whichever comes first.
- Test for total coliform and E. coli if your source has wildlife exposure or after heavy storms.
Annual deep maintenance
- Drain and wipe tanks to remove biofilm where accessible.
- Replace UV bulbs on schedule and clean the quartz sleeve.
- Pull and inspect submersible pump wiring and safety rope if your well allows easy access.
Signs you need immediate attention
- Suddenly drop in pressure or pulsing flow.
- Cloudy water after rain or snowmelt.
- Metallic taste, orange staining, or rotten egg odor.
- Any positive microbiological test. Switch to bottled water and troubleshoot before resuming normal use.
Water quality and health
Safe water depends on both design and diligence. Even a perfect UV unit cannot overcome muddy water that blocks light, and even the clearest rainwater picks up contaminants from roof dust without a first flush. Treat your system like a living appliance. Test strategically, log changes, and respond quickly when something shifts.
Smart add ons that improve reliability
- Dual source plumbing so you can switch from rain to well or vice versa with two valves.
- Low water cut off to protect the pump if storage runs dry.
- Flow meter on the main line to spot leaks and track daily use.
- Inline TDS meter on a reverse osmosis line so you know when membranes need attention.
- Small recirculation loop with a timer to keep hot water convenient while balancing energy use.
Common mistakes to avoid
- Sizing storage only for average days and not for dry spells.
- Skipping pre filtration and clogging expensive carbon or UV stages.
- Running pumps without a pressure tank which causes rapid cycling and early failures.
- Forgetting a bypass around treatment equipment which makes service a headache.
- Ignoring winterization for pipes that cross unheated spaces.
Example configurations
Compact cabin with rainwater
- 3000 liter tank, leaf screens, first flush, 50 to 5 micron sediment filters, carbon block, UV, and a small booster pump with pressure tank.
- Suits two people with modest use and a capture area of at least 60 square meters in a moderate rainfall region.
Family home on a good well
- Submersible pump, 60 liter pressure tank, 20 to 5 micron filters, softener for hardness, carbon polishing filter, and UV as final barrier.
- Suits four to five people with standard fixtures and lawn watering kept separate.
Homestead with creek intake
- Shaded intake below the surface, settling barrel, 100 to 20 to 5 micron filtration, carbon, UV, and a large storage tank for surge capacity.
- Works well where summer turbidity spikes and power reliability varies.
Final takeaways
Off-grid water systems reward good design and light but consistent care. Start by choosing the right source for your site, build a filtration and disinfection train that matches your water quality, size storage for dry spells, and keep a simple maintenance calendar. With that foundation, you will enjoy reliable, great tasting water at home without depending on a municipal supply.
Frequently asked questions
How much storage do I really need?
Plan for at least three days of your peak daily use. If you use 400 liters per day, target 1200 to 2000 liters so you can ride out storms, power cuts, or delivery delays.
Do I need both UV and chlorine?
Not always. UV protects at the point of treatment but leaves no residual in the tank. A small chlorine residual in storage can suppress growth. Many homeowners use UV alone for wells with stable quality and add chlorine only for rainwater or surface supplies.
How often should I change filters?
Replace based on pressure drop and water clarity, not just the calendar. As a rule of thumb, sediment filters last one to three months in murky conditions and three to six months in clear sources. Carbon blocks often last three to six months depending on usage.
Can I drink rainwater safely?
Yes, with proper screening, first flush, storage hygiene, and a final disinfection step. The treatment train matters more than the source when it comes to safety.